


- Joined
- Nov 9, 2008
- Messages
- 96
- Reaction score
- 53
Some of you may remember my old posting where I added "Deer Tracks" to the slippery laminated stock of my T/C Omega X7 -- well now, I've gone and done it again! Click Here for the link to the old X7 posting.
My best friend of many decades -- who is also now my daughter's father-in-law -- convinced me that he'd use the old X7 much more than I would, and I must have had the hots for something else at the time, so I sold it away... Recently though, I got the urge to get another late-season scoped muzzleloader and I went looking for another nice Omega. I got lucky and found a new-old-stock black/silver laminated stock Omega that was made back in 2003 that was in great shape, so I brought it home. If it was shot any, it couldn't have been more than 5 times as it didn't have a mark on it. (It did, as I found out though, have the "old style" breech plug and I posted about that last week.)
This time, instead of hunting with it just to find out again how "slick-ery" the laminated T/C really was (which is a dangerous combination of "slick" and "slippery"), I immediately set about to add another set of deer tracks to the stock to improve the grip on my Silver/Gray SS TC Omega.
Recalling that many here liked those deer tracks when I did them the first time, I took more "before" and "during" photo's this time, so what follows is a mini-tutorial on how I did it, just in case someone else gets inspired to do the same.
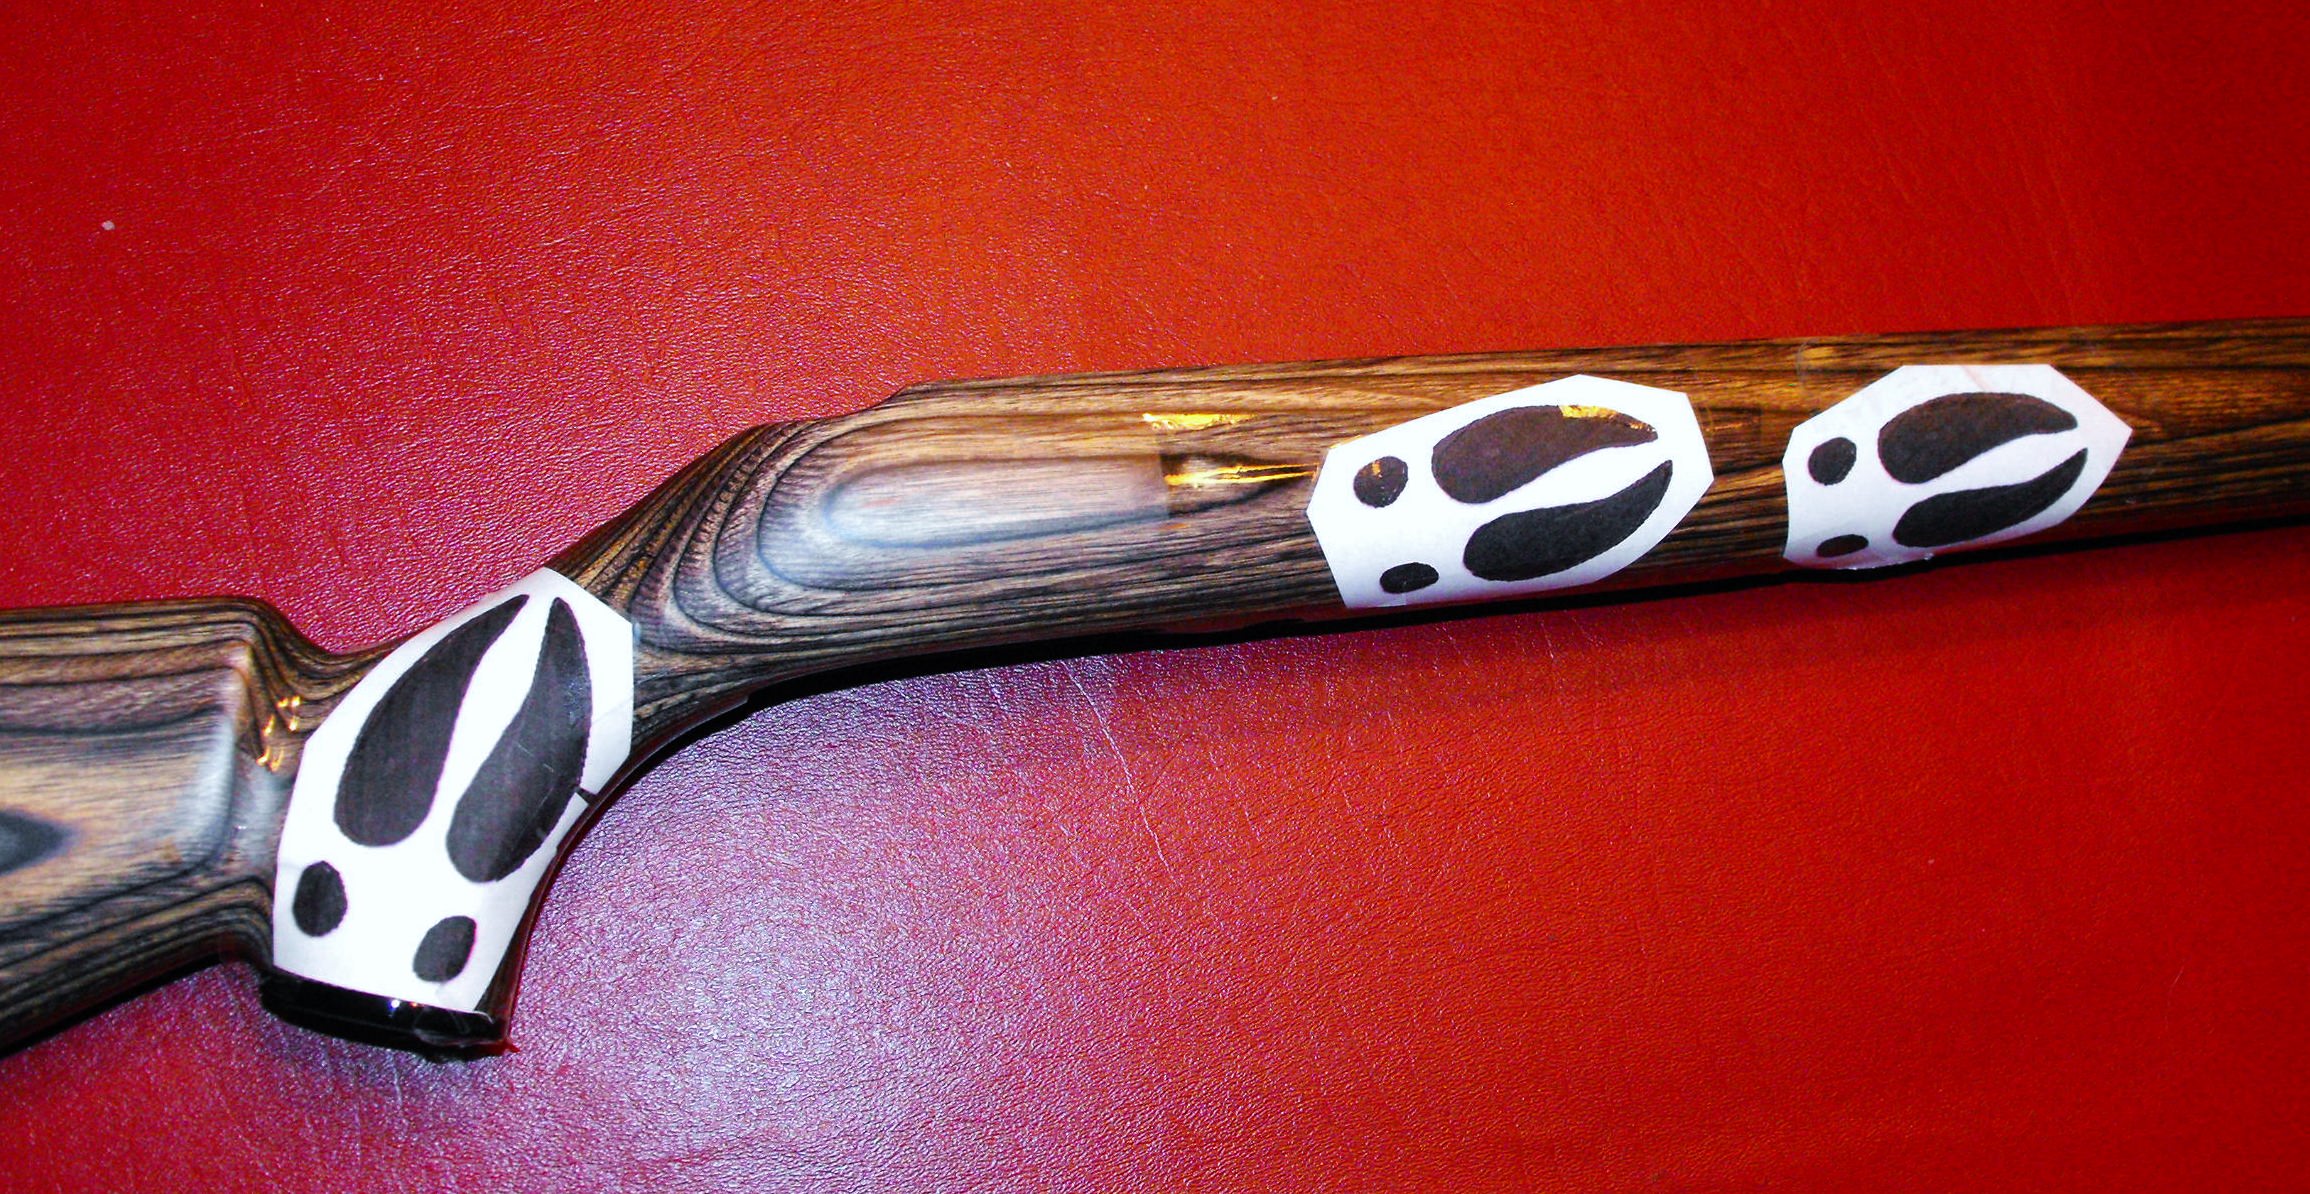
So here we go... Deer Track prints can be found on Google/Images and you can paste the image into a program like Paint or PowerPoint to change the sizes, as I did. Once I get the track to the size and position I wanted, I copy it, paste and then "reverse image" the track to get a set to use on the other side of the gun; that way, both sides mirror each other. When I cut them out from paper, I put one over the other and cut both at the same time, then I can use corners or parts of the track as a reference point to measure to the edge of the stock or screw hole, etc to ensure the positioning on both sides is the same. Here you see the tracks taped to the stock where they'll be added:
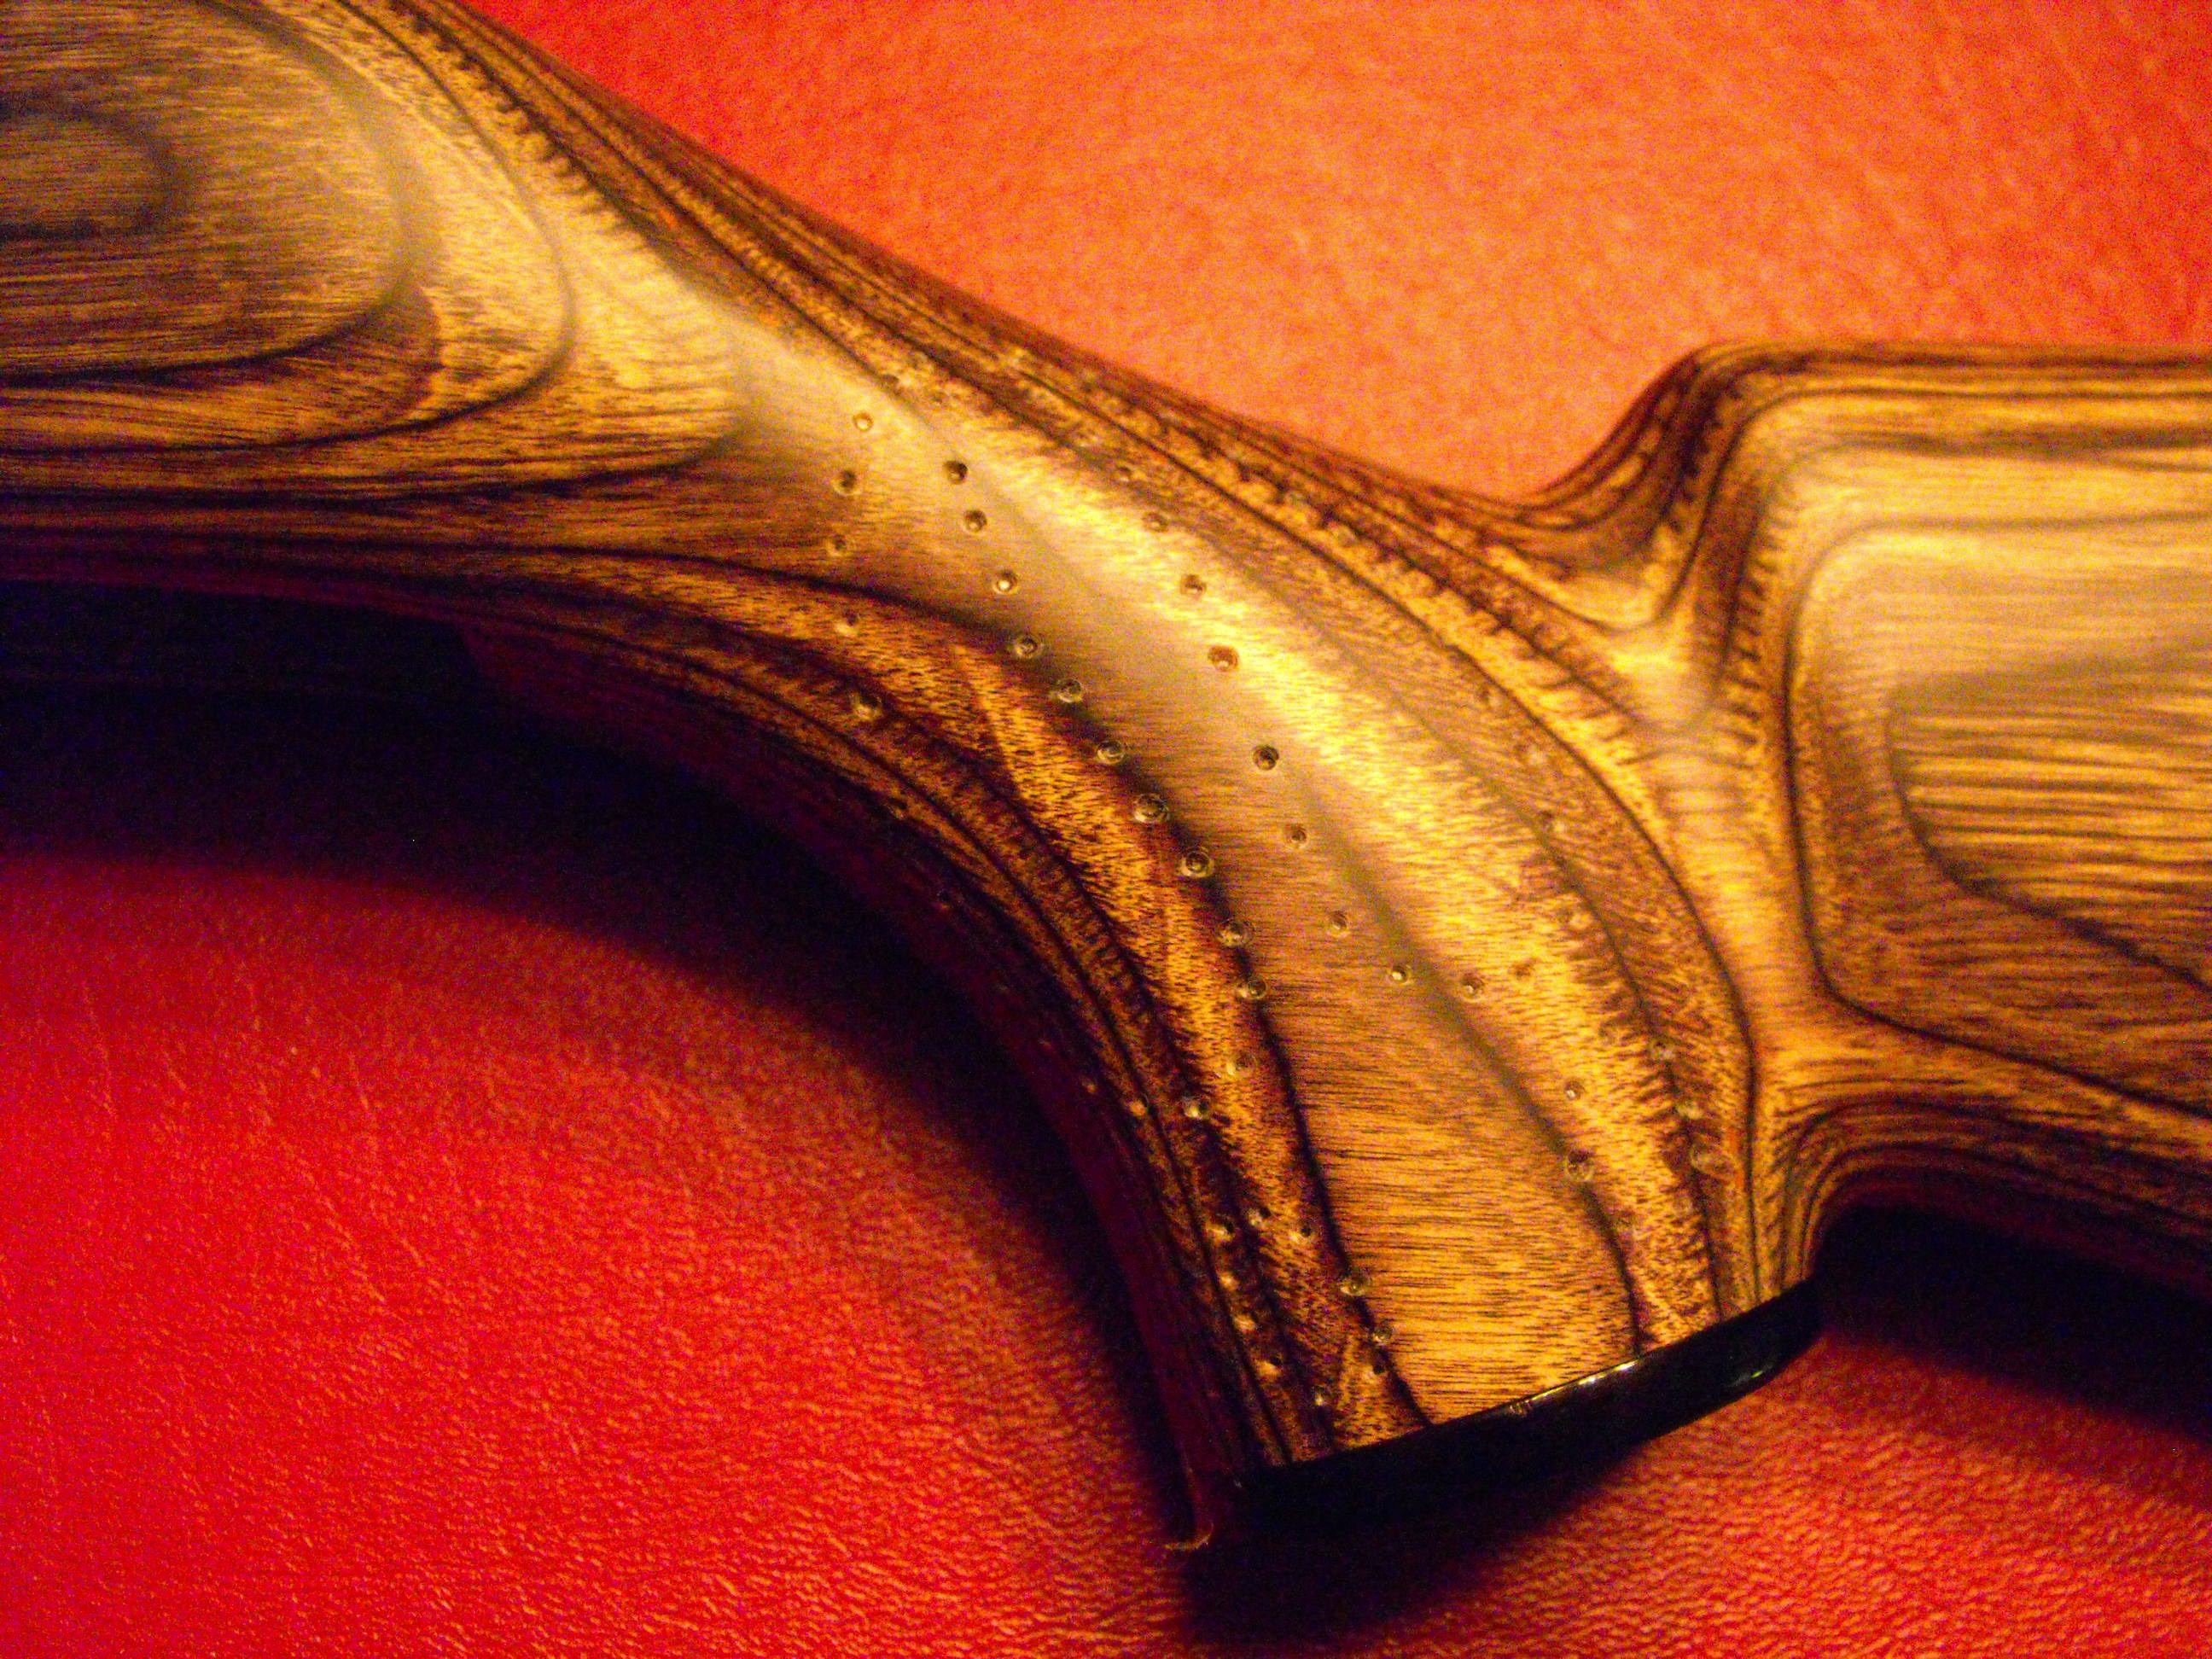
Then I used a sharp punch (could use a nail) to put a dot every 1/4" or 3/8" or so around the outline of the track. These get covered by the dimples or ball cuts later, as I used a small ball cutter mounted on the flexible shaft of a Dremel Tool. Just go slow and don't let the punch slip on you. Also, it pays to know in advance when you're following a line of dots whether you are cutting inside or outside of that line. Just take a look at the holes you made and the print of the track to keep in mind where you're at and what needs to be cut. Seriously, it's almost like "coloring" -- only using a Dremel Tool -- so just stay inside the lines!!
Here's a close-up of the "1st cuts" of the dimples, divots or cuts left by the ball cutter. How close you space them, or overlap the cuts is up to you, but while this looks OK, I knew it could be better. I do wear a 5X magnifying headpiece when I do this close-up work. What you can't easily see here, due to the "50 Shades of Gray" on my stock :wink: is the "islands" of stock between some cuts:
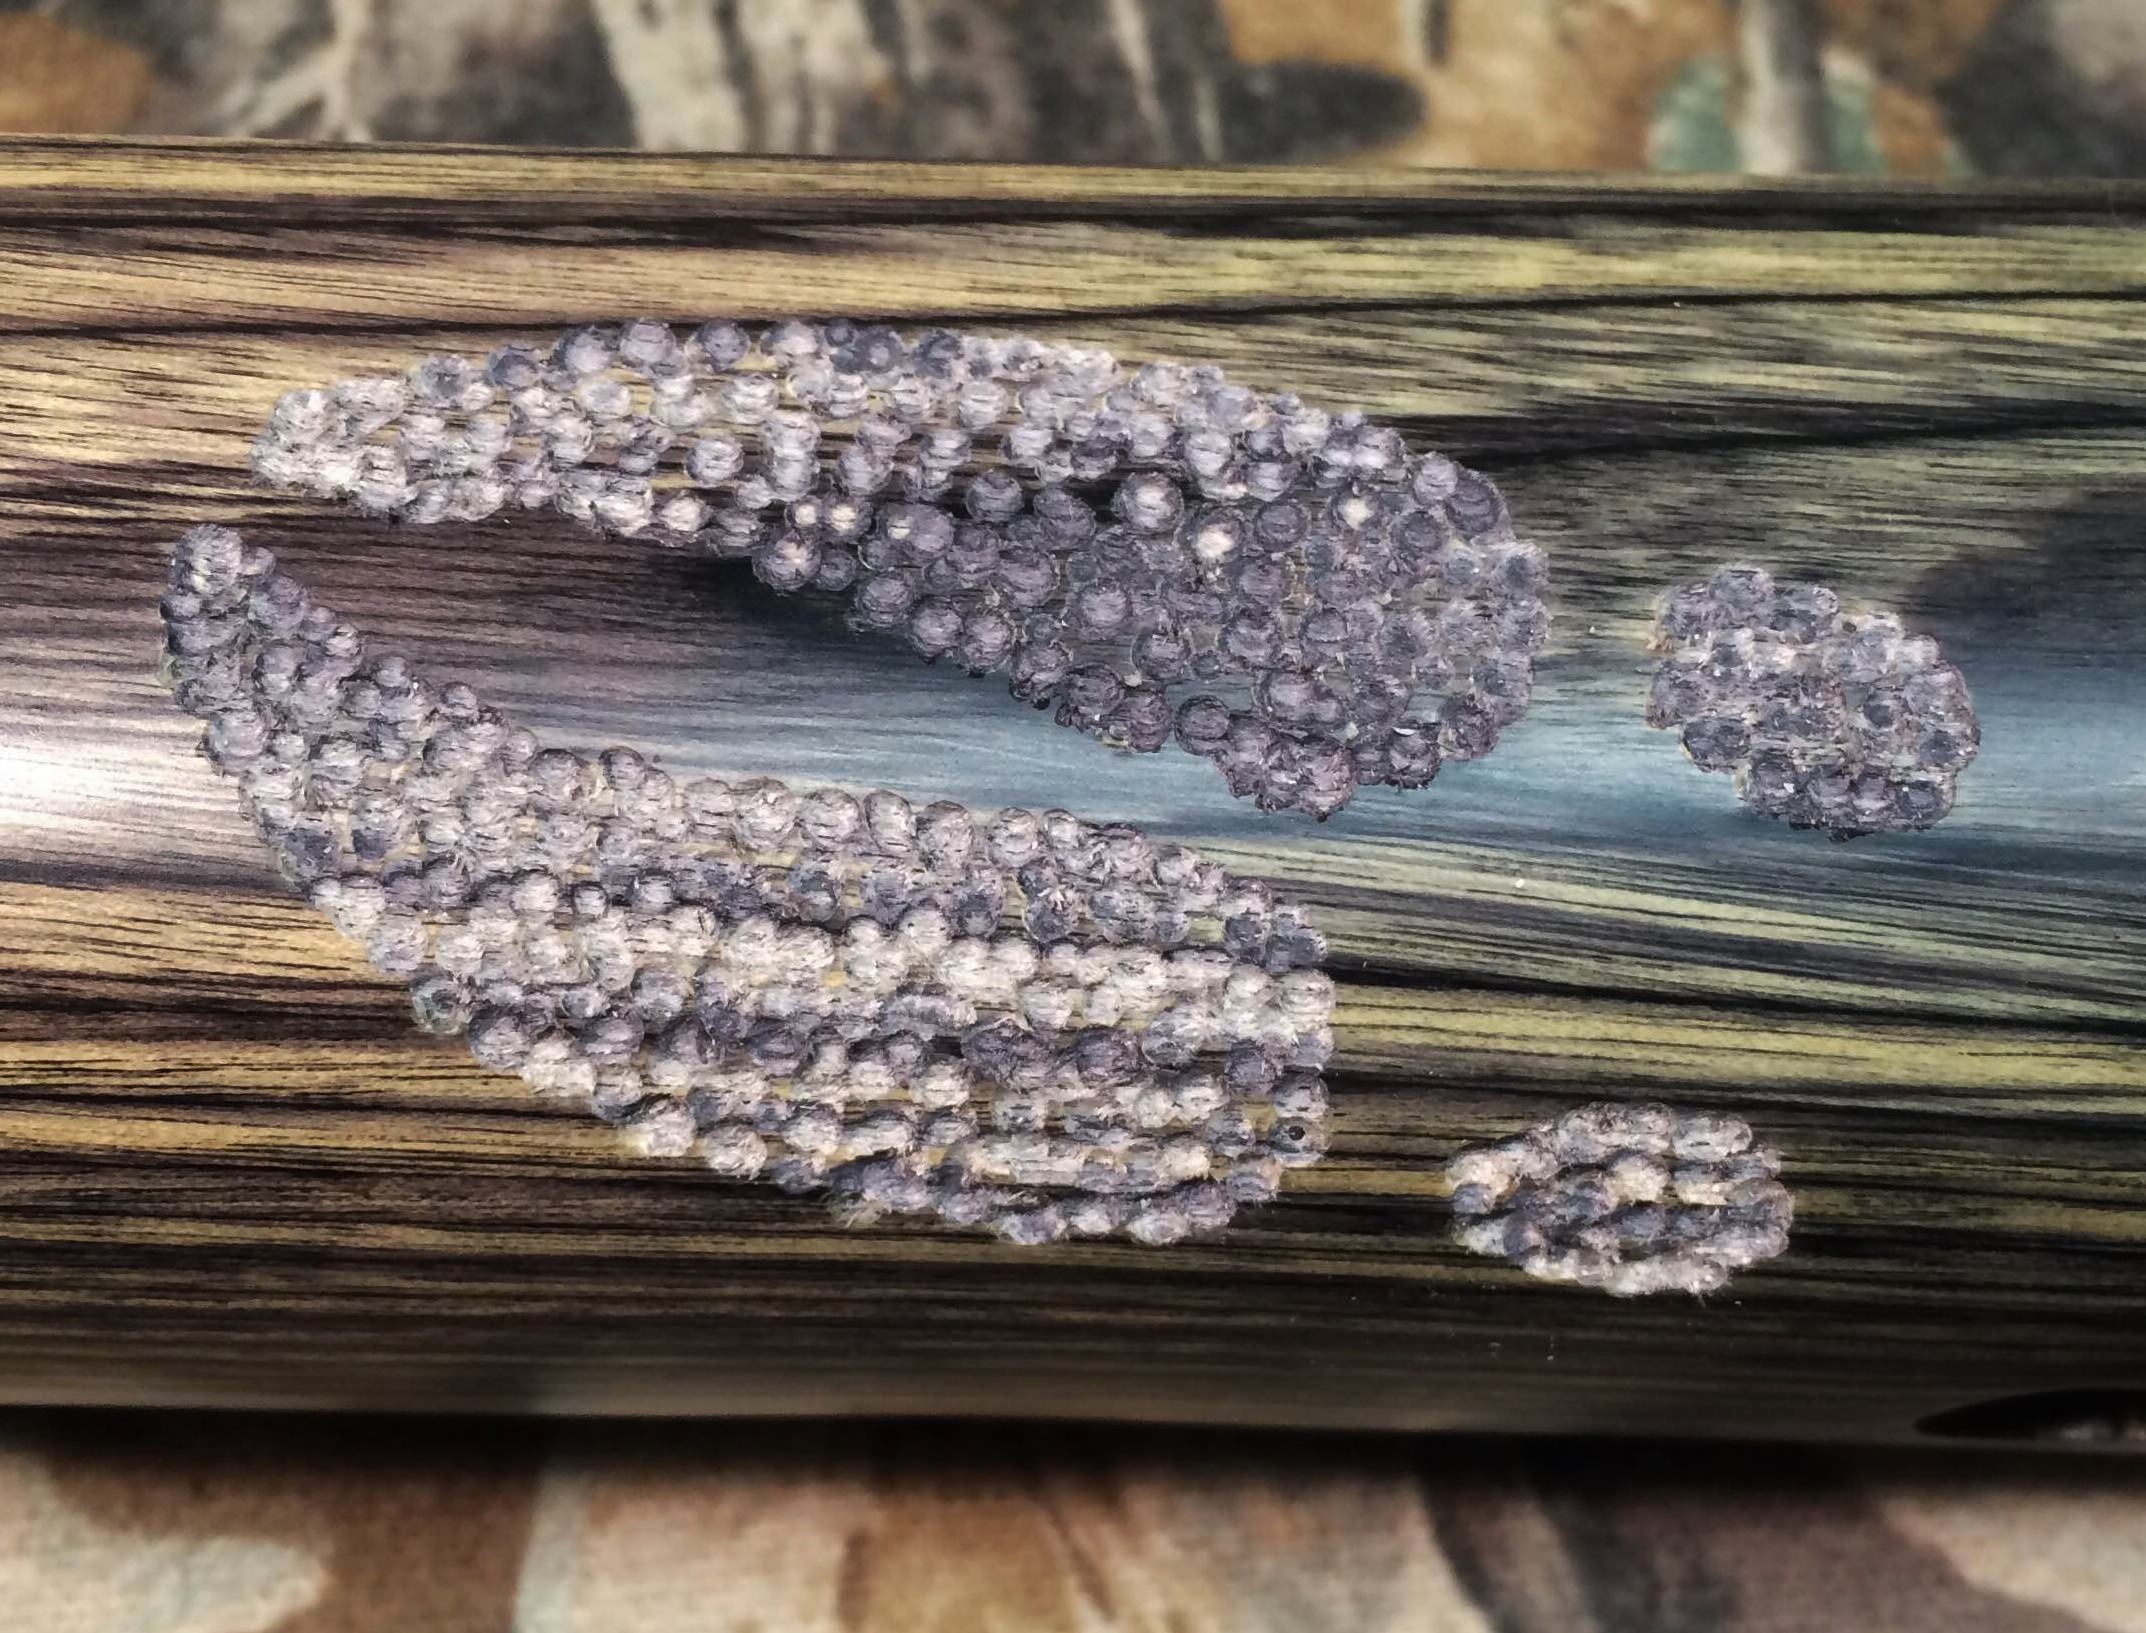
So in this pix, I added one coat of flat black paint, from one of those felt pens that Birchwood Casey sells for touching up gun parts. The added paint really makes the "holidays" or "islands" of stock material that still needs to be cut away more easily seen:
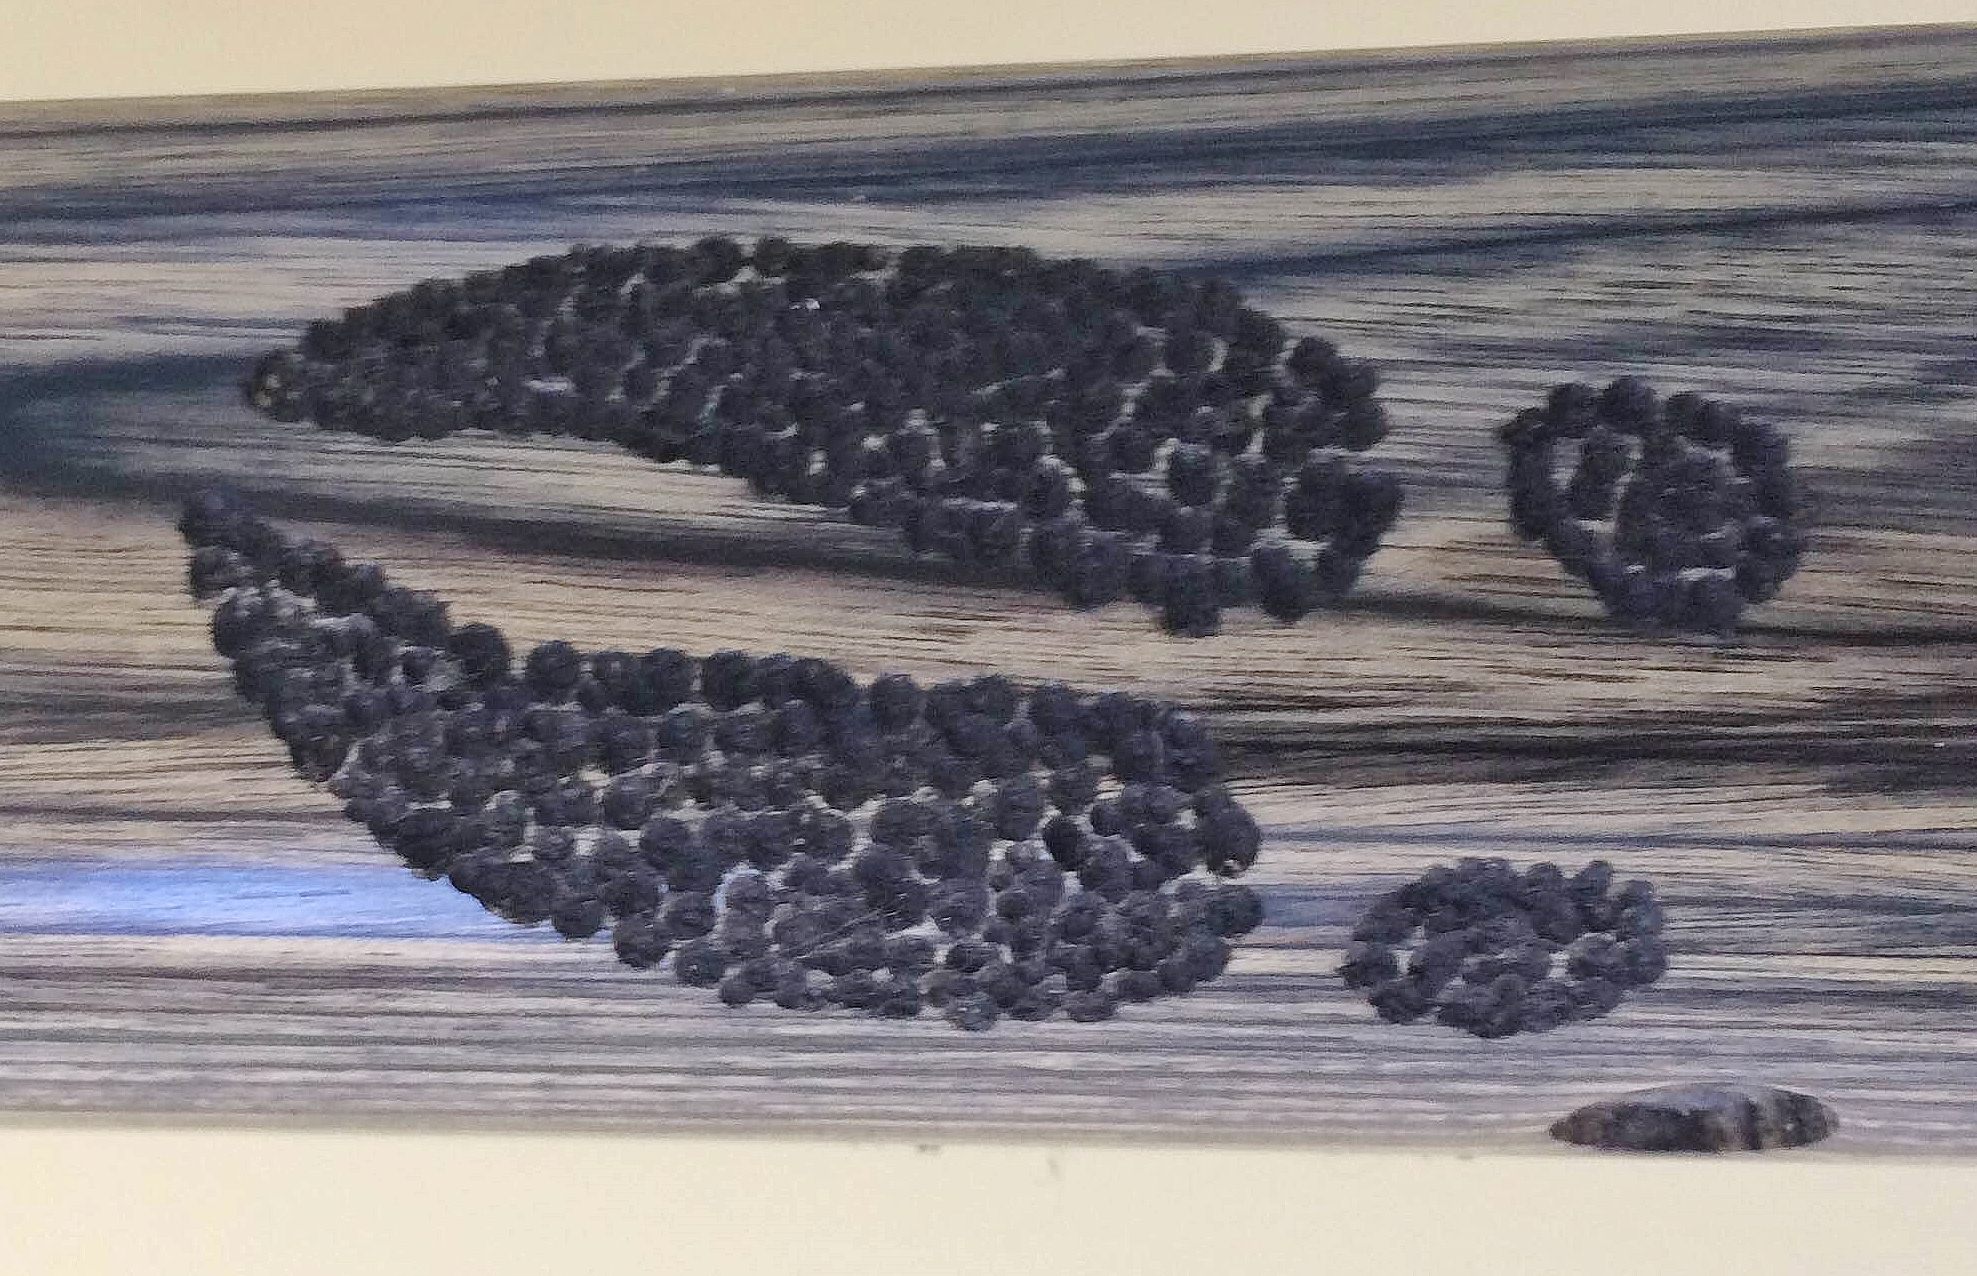
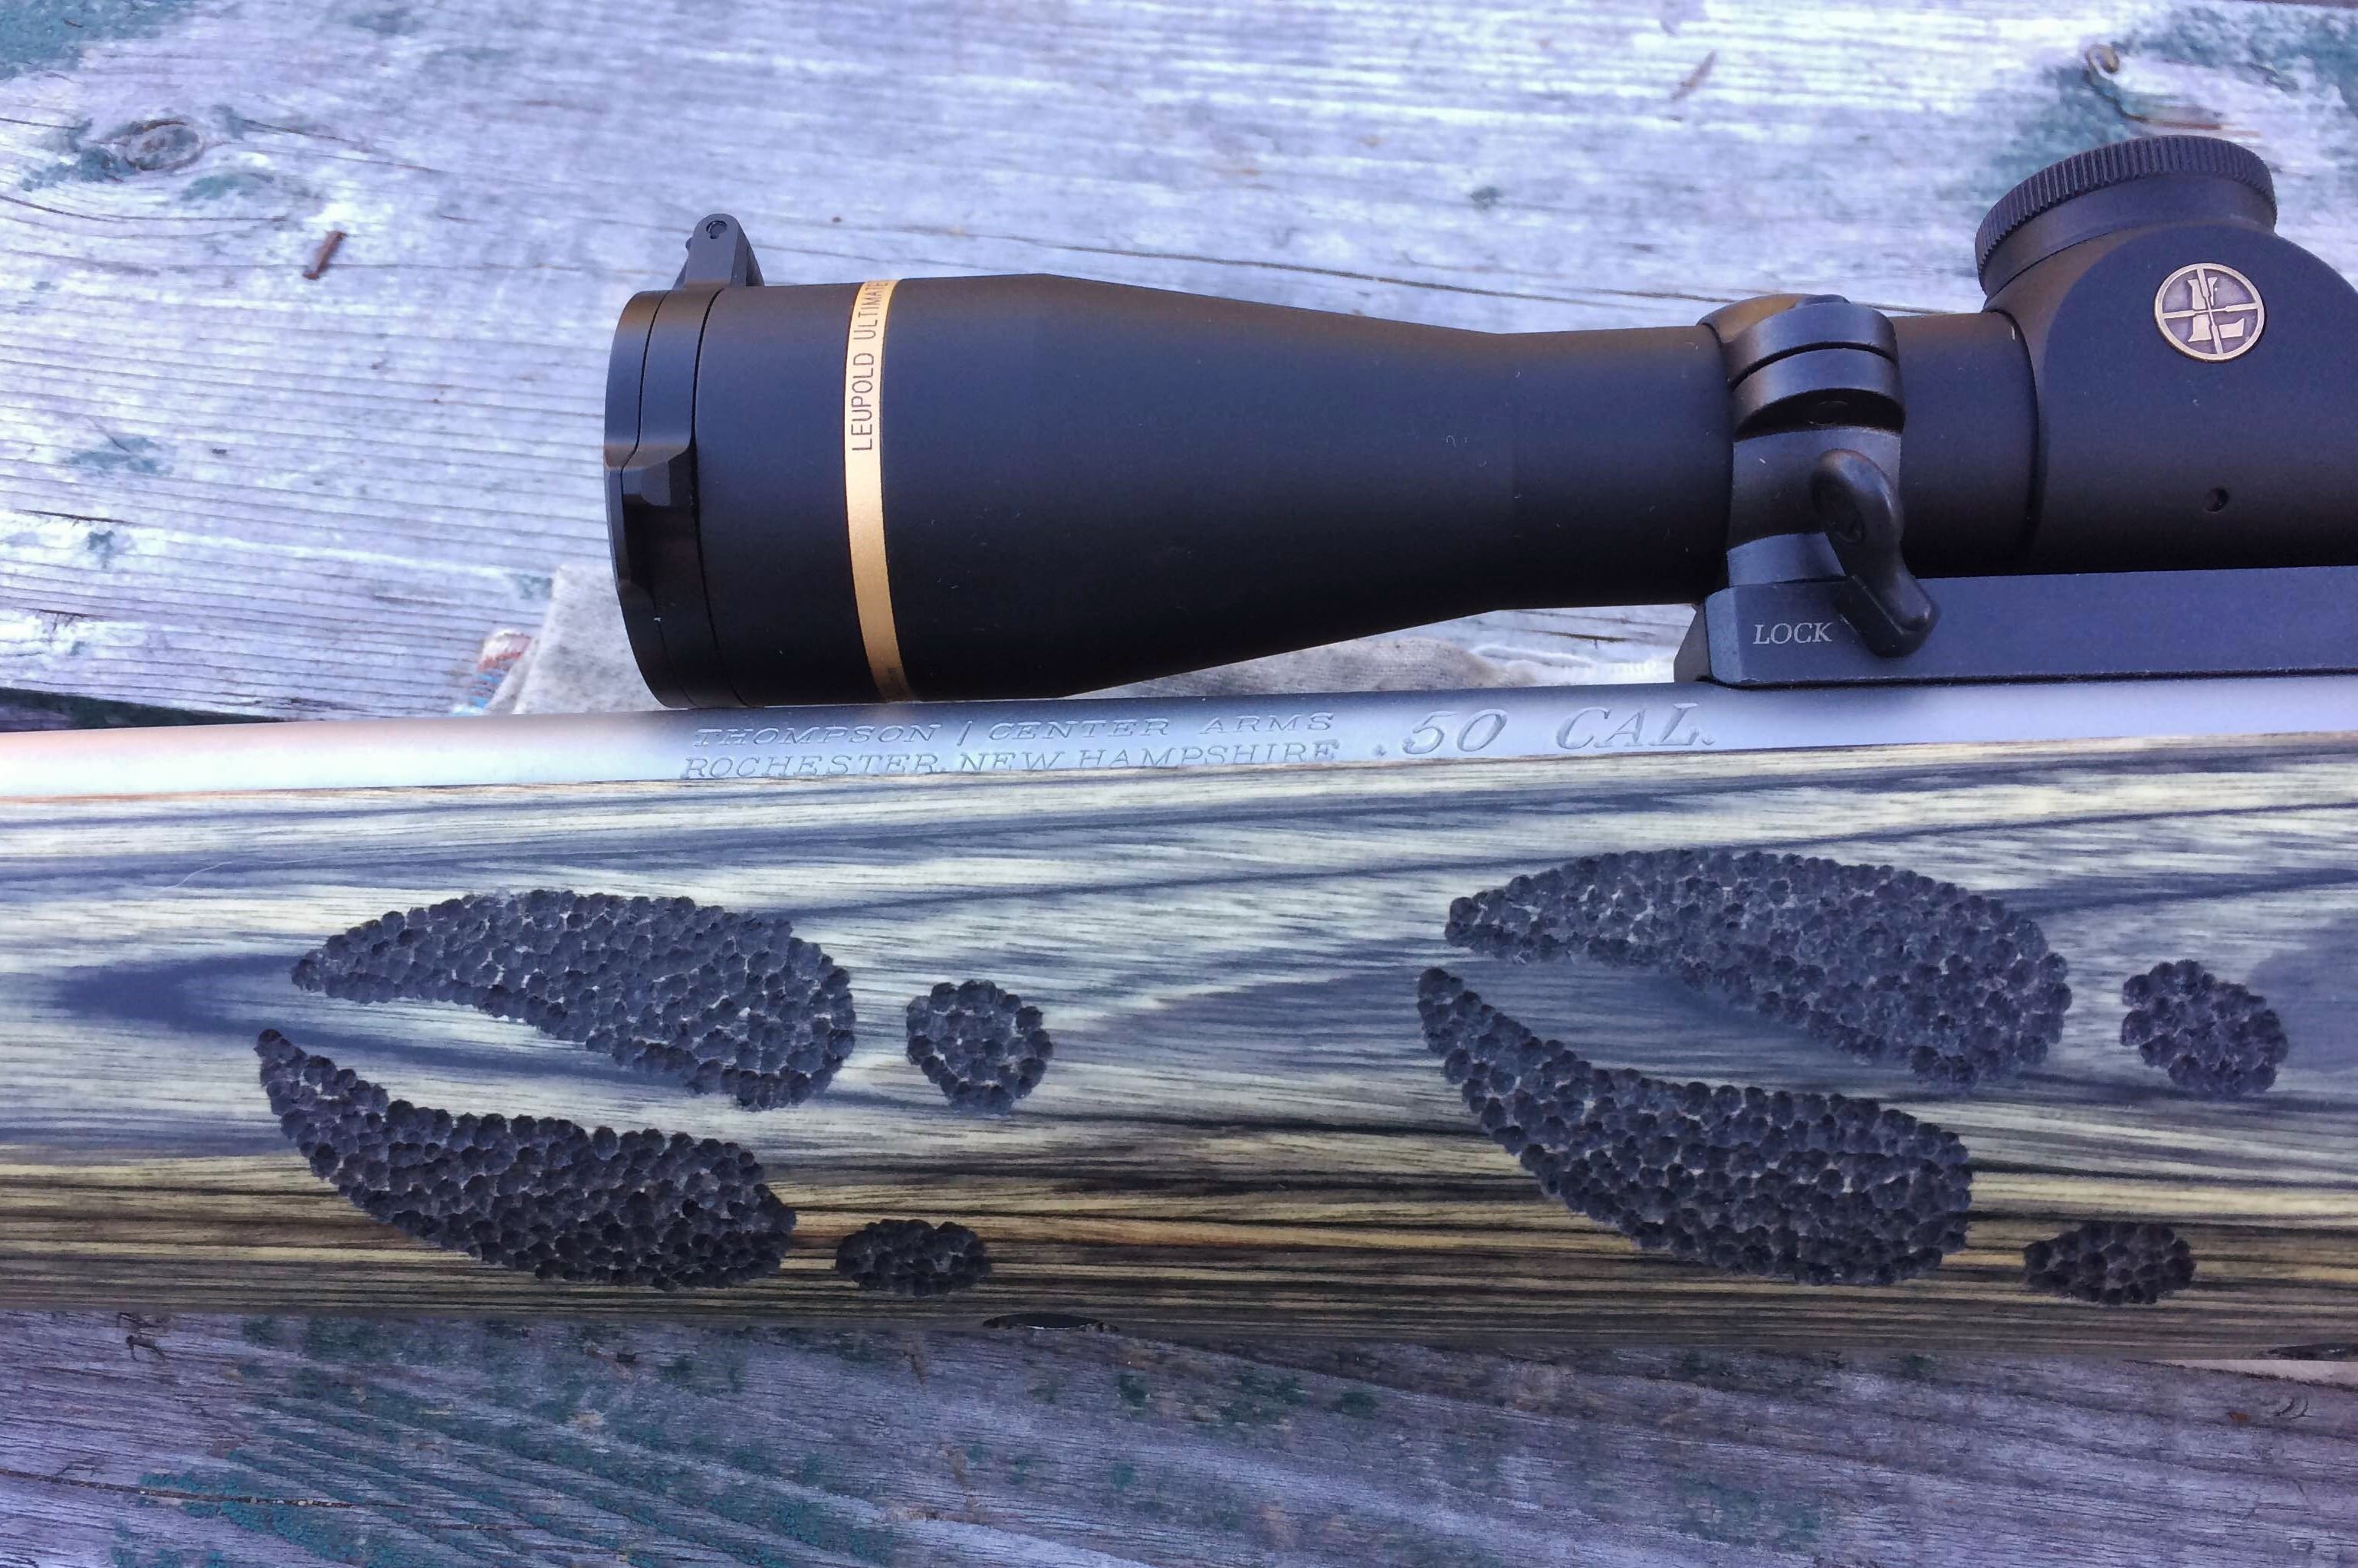
For a job like this, it's best to put it down and walk away and come back fresh, so that's what I did while the paint dried. And I came back and finished the deer tracks a couple of nights later. I tried to get a more even pattern on each track, and I am pretty pleased with how it came out. And I do think it's even better than the tracks on the X7, due to doing the 2nd pass with the cutting tool and also because I think the black paint provides better contrast to the stock versus the brown stain I had used on the brown X7's stock. Here's the forearm:
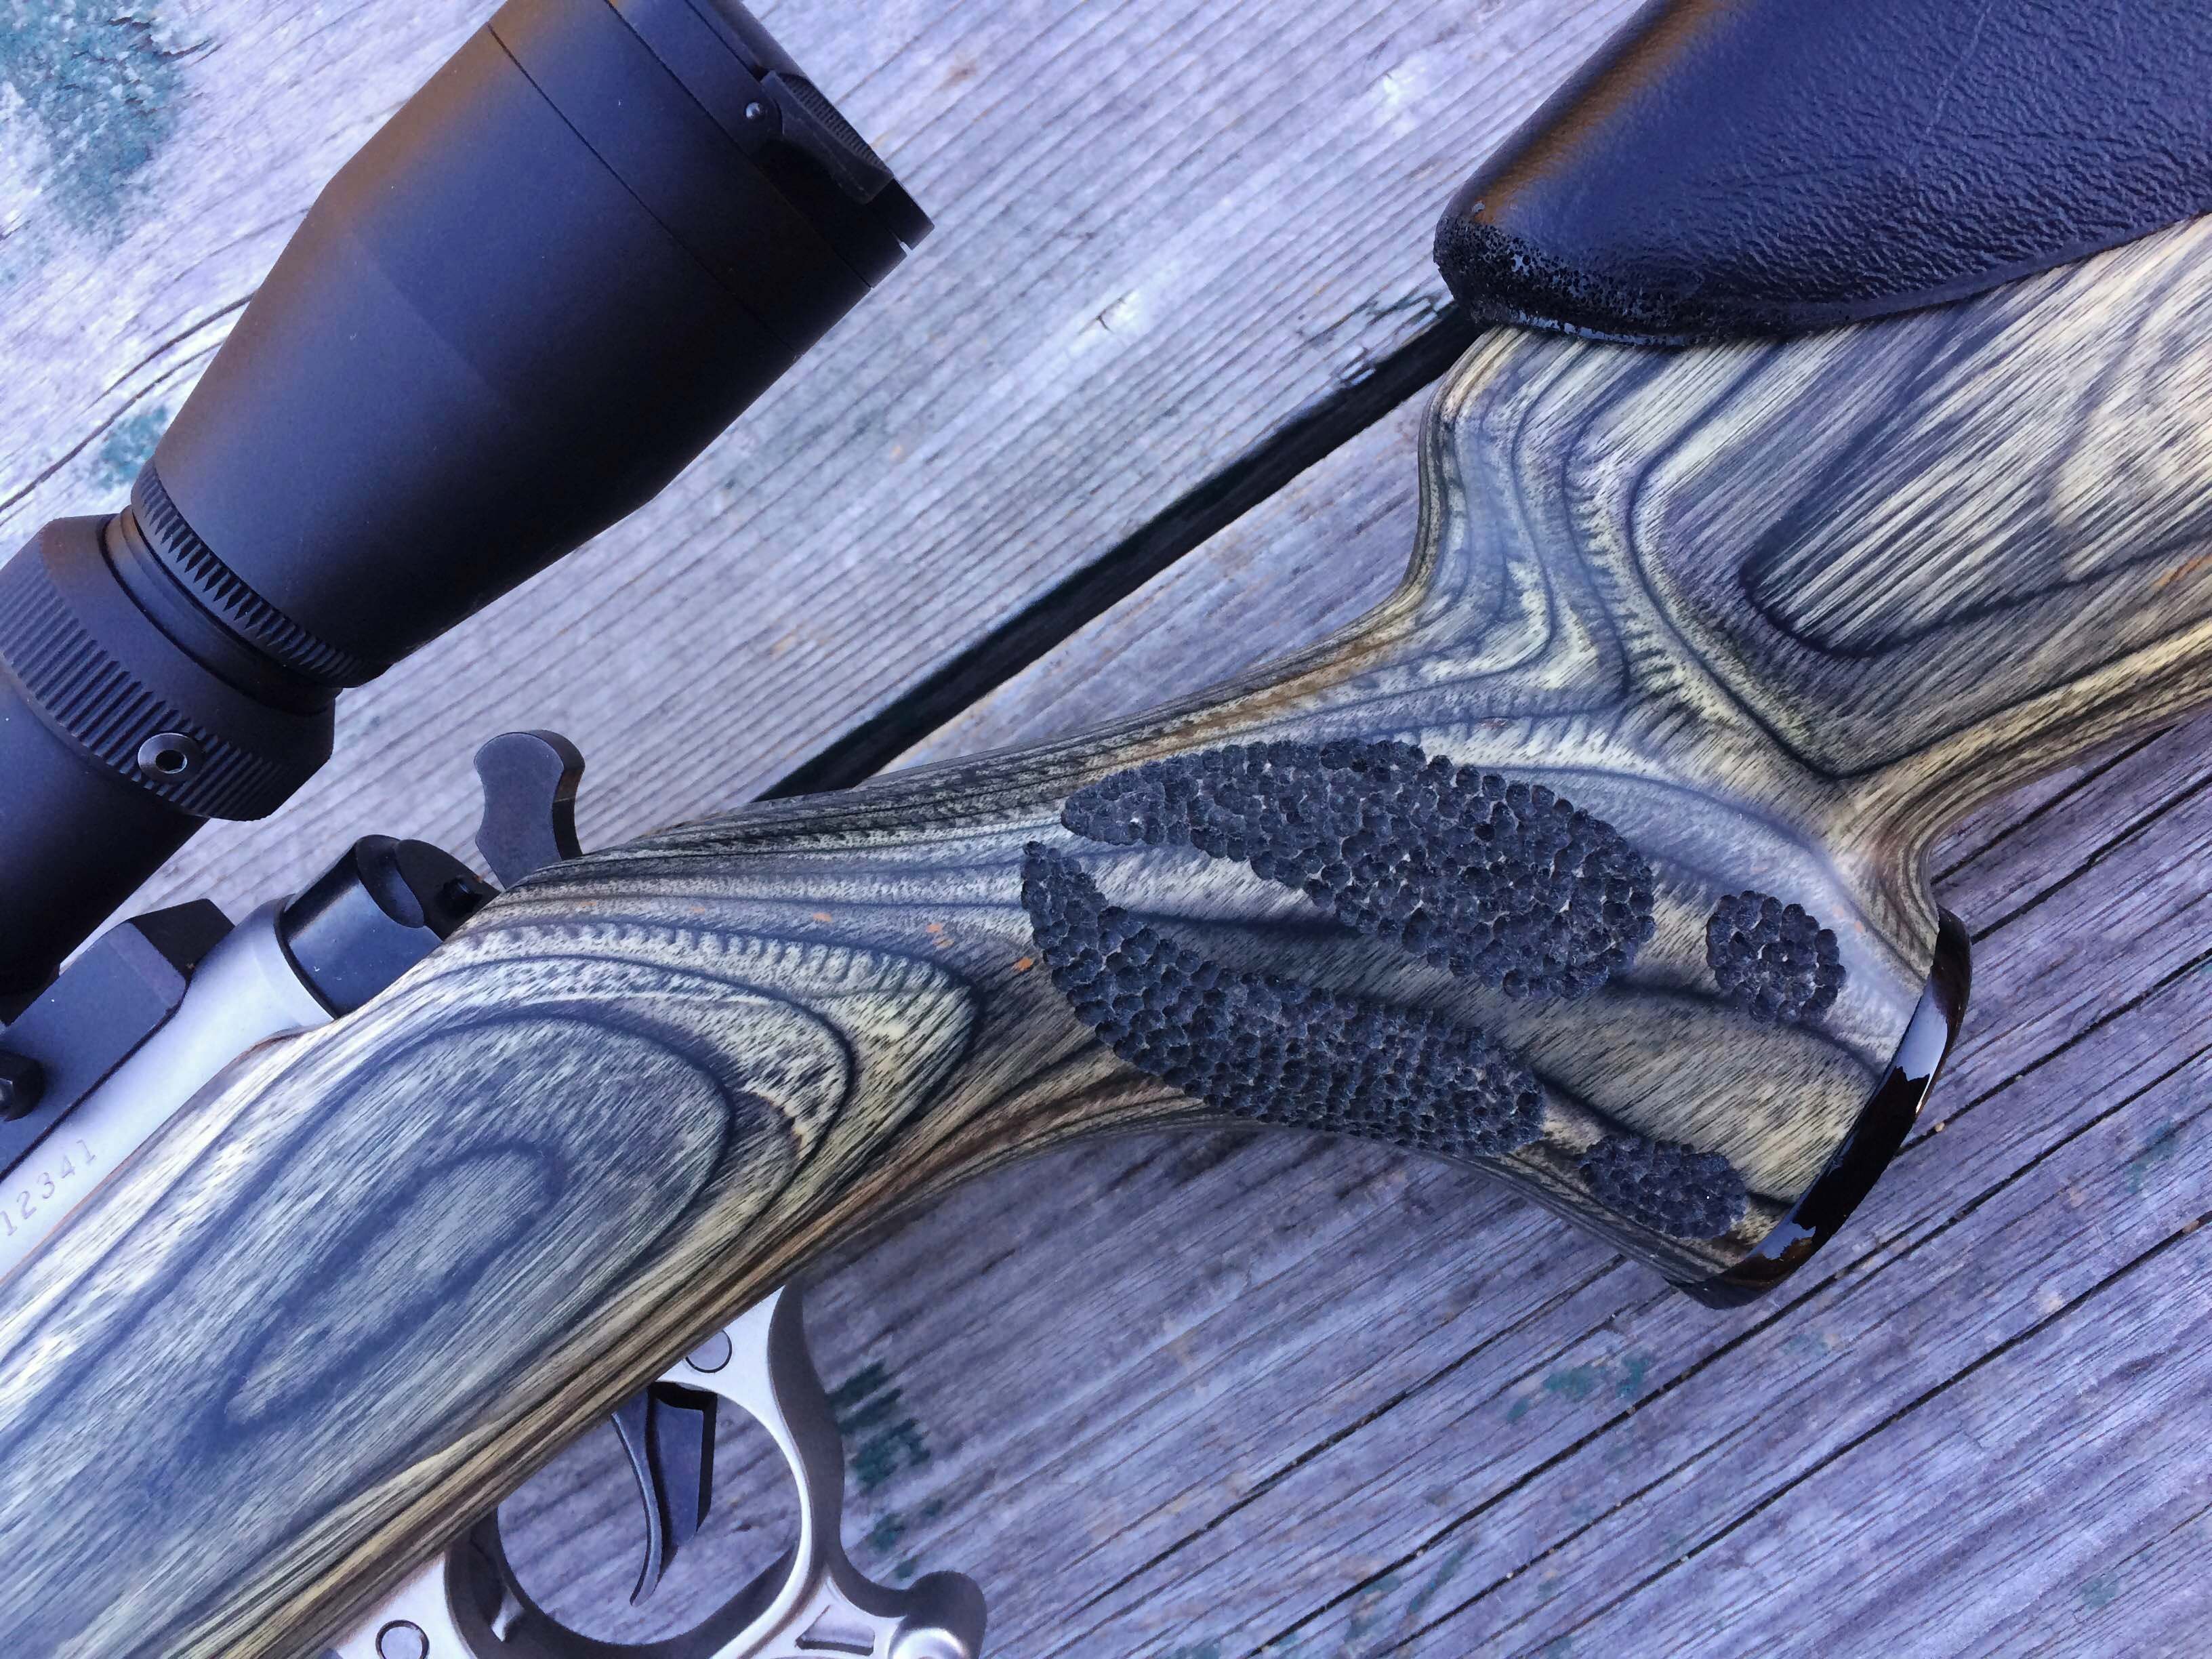
By the way, you can see I added a Leupold Scope, as I'm partial to that brand, and I also like the performance and features of their 2-7X Ultimate Slam Scope -- mounted as low as possible too -- and using their QR mount/rings is a plus too, I think. Here's a close-up of the pistol grip area:
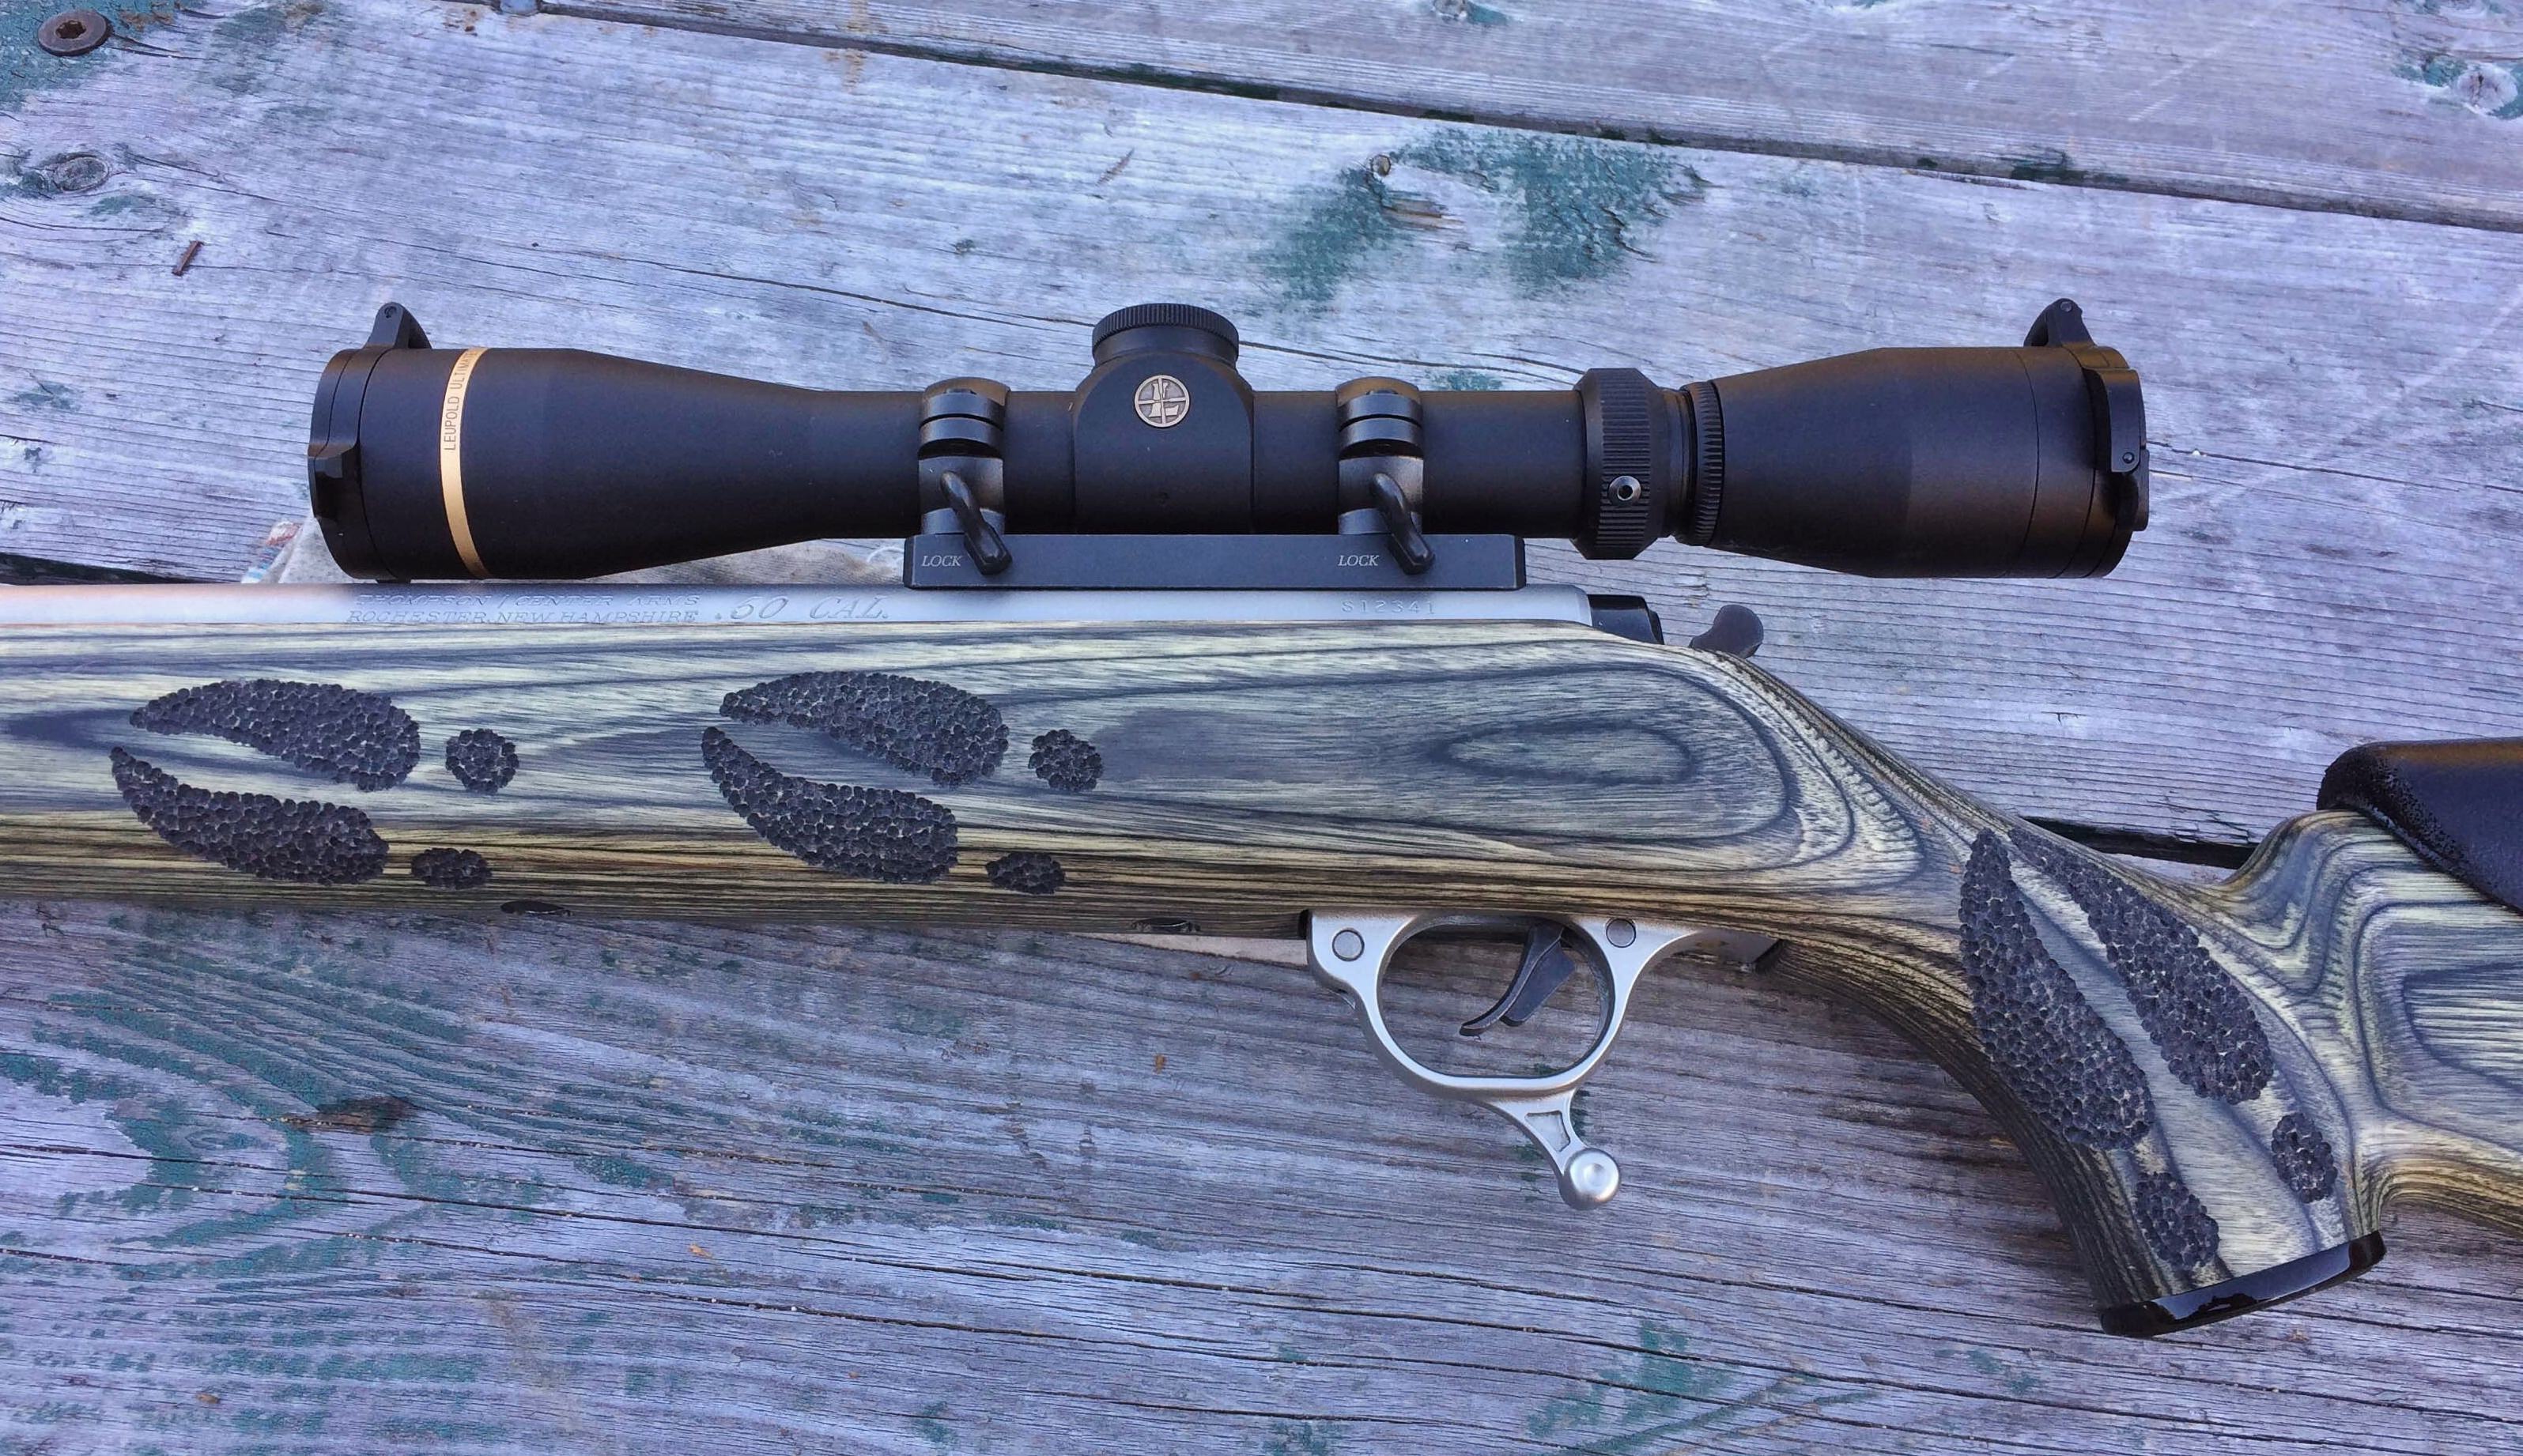
And finally, this will show you all areas of the Omega's stock where the grip was much improved -- and, may I say, I think it looks pretty sharp and very appropriate too!
Good luck to anyone else who does this. PM me if you have questions, but it's not all that difficult; as once you've made the first nail punch or cut, you're committed and then it goes along pretty quickly.
Tight groups.
Old No7
My best friend of many decades -- who is also now my daughter's father-in-law -- convinced me that he'd use the old X7 much more than I would, and I must have had the hots for something else at the time, so I sold it away... Recently though, I got the urge to get another late-season scoped muzzleloader and I went looking for another nice Omega. I got lucky and found a new-old-stock black/silver laminated stock Omega that was made back in 2003 that was in great shape, so I brought it home. If it was shot any, it couldn't have been more than 5 times as it didn't have a mark on it. (It did, as I found out though, have the "old style" breech plug and I posted about that last week.)
This time, instead of hunting with it just to find out again how "slick-ery" the laminated T/C really was (which is a dangerous combination of "slick" and "slippery"), I immediately set about to add another set of deer tracks to the stock to improve the grip on my Silver/Gray SS TC Omega.
Recalling that many here liked those deer tracks when I did them the first time, I took more "before" and "during" photo's this time, so what follows is a mini-tutorial on how I did it, just in case someone else gets inspired to do the same.
So here we go... Deer Track prints can be found on Google/Images and you can paste the image into a program like Paint or PowerPoint to change the sizes, as I did. Once I get the track to the size and position I wanted, I copy it, paste and then "reverse image" the track to get a set to use on the other side of the gun; that way, both sides mirror each other. When I cut them out from paper, I put one over the other and cut both at the same time, then I can use corners or parts of the track as a reference point to measure to the edge of the stock or screw hole, etc to ensure the positioning on both sides is the same. Here you see the tracks taped to the stock where they'll be added:
Then I used a sharp punch (could use a nail) to put a dot every 1/4" or 3/8" or so around the outline of the track. These get covered by the dimples or ball cuts later, as I used a small ball cutter mounted on the flexible shaft of a Dremel Tool. Just go slow and don't let the punch slip on you. Also, it pays to know in advance when you're following a line of dots whether you are cutting inside or outside of that line. Just take a look at the holes you made and the print of the track to keep in mind where you're at and what needs to be cut. Seriously, it's almost like "coloring" -- only using a Dremel Tool -- so just stay inside the lines!!
Here's a close-up of the "1st cuts" of the dimples, divots or cuts left by the ball cutter. How close you space them, or overlap the cuts is up to you, but while this looks OK, I knew it could be better. I do wear a 5X magnifying headpiece when I do this close-up work. What you can't easily see here, due to the "50 Shades of Gray" on my stock :wink: is the "islands" of stock between some cuts:
So in this pix, I added one coat of flat black paint, from one of those felt pens that Birchwood Casey sells for touching up gun parts. The added paint really makes the "holidays" or "islands" of stock material that still needs to be cut away more easily seen:
For a job like this, it's best to put it down and walk away and come back fresh, so that's what I did while the paint dried. And I came back and finished the deer tracks a couple of nights later. I tried to get a more even pattern on each track, and I am pretty pleased with how it came out. And I do think it's even better than the tracks on the X7, due to doing the 2nd pass with the cutting tool and also because I think the black paint provides better contrast to the stock versus the brown stain I had used on the brown X7's stock. Here's the forearm:
By the way, you can see I added a Leupold Scope, as I'm partial to that brand, and I also like the performance and features of their 2-7X Ultimate Slam Scope -- mounted as low as possible too -- and using their QR mount/rings is a plus too, I think. Here's a close-up of the pistol grip area:
And finally, this will show you all areas of the Omega's stock where the grip was much improved -- and, may I say, I think it looks pretty sharp and very appropriate too!
Good luck to anyone else who does this. PM me if you have questions, but it's not all that difficult; as once you've made the first nail punch or cut, you're committed and then it goes along pretty quickly.
Tight groups.
Old No7
