


- Joined
- May 21, 2016
- Messages
- 293
- Reaction score
- 301
I wanted to dabble in a caplock for eventual 100 to 200 yard shooting but didn't wanna toss out too much coin (I prefer flintlocks). I went for a bit more dollars on a DGW Investarms (Italy) .50 Hawen kit because the cheaper Traditions and CVA (Spain) kits wouldn't allow breech plug removal without buggering the barrel. The 29" barrel has a 1:48 twist to reasonably well accommodate both patched balls and bullets (Lee R.E.A.L.).
I stuck on all the brass parts and sanded and filed everything to fit. That was kinda fun and didn't take too long at all. I spent very little time on the brass, just cleaned up any flashings but didn't do any fine filing or abrasive work. When it all fit and looked well, I wicked in water thin CYA to the barrel and lock inlets to help seal from the oil and water and bp residue, then I rubbed in a few coats of MinWax wipe-on polyU to the walnut stock. I left the barrel in-the-white, I kinda like that look and will allow it to patina on its own. The parts went together fairly well even though the large bag of assorted screws had no legend as to which one went where - kinda just took an educated guess and it turned out ok. The lock was another issue. The coiled mainspring stop arrived busted clear off the lock plate ...

... so while I was working on the furniture and wood, DGW made good and sent out a replacement. However, it didn't align with the nipple and was about 1/16th inch to the right and down ...

With the lock on the rifle I scribed a pencil line where the cock met the stock, then completely disassembled the lock, put the hammer in a vise so the scribed line was below the vise jaws and gave it a few whacks on its right side with a 5lb machinist's hammer. There, that took care of the lateral alignment. Getting the cock to lift up 1/16th was entirely another matter and required heating the cock and cup cherry red and grunting it up with a large ViseGrips - took three tries to get it as close as I could, but it finally yielded a good cock/nipple alignment that covered a #11 cap ...

I'm used to the peep sights on my BPCR rifles so that was a requirement for this kinda-sorta-Hawken. I removed the existing barrel rear sight and drifted out the front blade sight, installed a Lyman GPR rear peep on the tang and drifted in a Lyman 17A globe to the front.


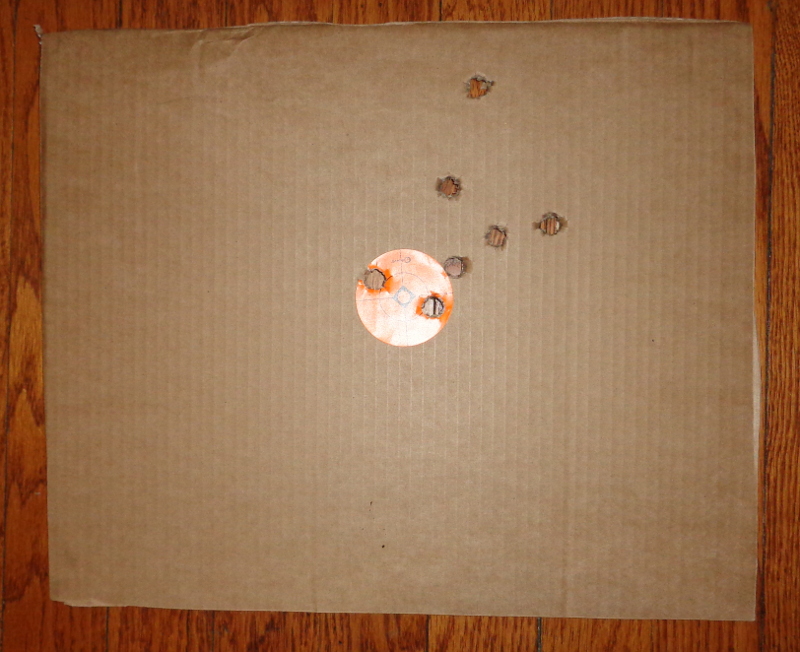
I had a very small window of time to maiden it and only got off 7 patched ball shots at something a tad over 25 yards, using light powder charges of 50 to 60 grains, but clearly load development needs committed time and effort that I won't have 'til next month. The two holes in the 2" aiming spot were the last two shot, with 60 grains of Swiss 3F. Hey, it's a start ....
[youtube]WJr9NjtuhxY[/youtube]
I stuck on all the brass parts and sanded and filed everything to fit. That was kinda fun and didn't take too long at all. I spent very little time on the brass, just cleaned up any flashings but didn't do any fine filing or abrasive work. When it all fit and looked well, I wicked in water thin CYA to the barrel and lock inlets to help seal from the oil and water and bp residue, then I rubbed in a few coats of MinWax wipe-on polyU to the walnut stock. I left the barrel in-the-white, I kinda like that look and will allow it to patina on its own. The parts went together fairly well even though the large bag of assorted screws had no legend as to which one went where - kinda just took an educated guess and it turned out ok. The lock was another issue. The coiled mainspring stop arrived busted clear off the lock plate ...
... so while I was working on the furniture and wood, DGW made good and sent out a replacement. However, it didn't align with the nipple and was about 1/16th inch to the right and down ...
With the lock on the rifle I scribed a pencil line where the cock met the stock, then completely disassembled the lock, put the hammer in a vise so the scribed line was below the vise jaws and gave it a few whacks on its right side with a 5lb machinist's hammer. There, that took care of the lateral alignment. Getting the cock to lift up 1/16th was entirely another matter and required heating the cock and cup cherry red and grunting it up with a large ViseGrips - took three tries to get it as close as I could, but it finally yielded a good cock/nipple alignment that covered a #11 cap ...
I'm used to the peep sights on my BPCR rifles so that was a requirement for this kinda-sorta-Hawken. I removed the existing barrel rear sight and drifted out the front blade sight, installed a Lyman GPR rear peep on the tang and drifted in a Lyman 17A globe to the front.
I had a very small window of time to maiden it and only got off 7 patched ball shots at something a tad over 25 yards, using light powder charges of 50 to 60 grains, but clearly load development needs committed time and effort that I won't have 'til next month. The two holes in the 2" aiming spot were the last two shot, with 60 grains of Swiss 3F. Hey, it's a start ....
[youtube]WJr9NjtuhxY[/youtube]
