the full cock notch (tumbler) looks like it has a chip in the corner, as does the sear. Rounding the sear is a way to lighten the trigger pull, so thats why it looks funky when its in the full cock and half cock position.
You are using an out of date browser. It may not display this or other websites correctly.
You should upgrade or use an alternative browser.
You should upgrade or use an alternative browser.
Rifle Arrived Today - Problems Already - Minor ?
- Thread starter rowdyjoe
- Start date


Help Support Modern Muzzleloading Forum:
This site may earn a commission from merchant affiliate
links, including eBay, Amazon, and others.
Thanks Jonathan.
It locks into each position pretty solid so, I think it will be OK to operate once I replace the sear spring. Is there anything special I need to know about replacing that spring? It looks to be pretty straight forward to me.
It locks into each position pretty solid so, I think it will be OK to operate once I replace the sear spring. Is there anything special I need to know about replacing that spring? It looks to be pretty straight forward to me.
Well, the new spring and trigger assembly arrived today. However, I'm not having any luck with either part. The old sear spring looks exactly like the new one ....that is, unbroken. Now what? It appears the sear is rotating too far down and the end of the sear spring no longer touches it but, blocks it from releasing the tumbler.
Sear spring issue fixed ...I finally saw the small tab on the spring and positioned it to sit in the hole in the lock plate and the lock is working fine now.
However, the main spring in the new set trigger broke at the bolt/screw hole while trying to adjust it. Since Deer Creek is closed today, I left a message asking for a replacement spring. I haven't had much success at getting answers to messages from them so, I"ll call the on Monday.
Is there a "fix/replacement" for these brittle trigger main springs?
Buck Conner1
Well-Known Member
- Joined
- Oct 20, 2015
- Messages
- 4,592
- Reaction score
- 558
Are you getting the feeling that you should have passed on this rifle ??? I would be getting that feeling if it were mine..... :?:
Not really.
I'm the one who broke the sear spring and the new trigger main spring. The old one was broken when I got it but, at least it worked.
I'm learning and making some progress. If I can figure out a fix for the trigger main spring problem it will be in good shape.
I'm the one who broke the sear spring and the new trigger main spring. The old one was broken when I got it but, at least it worked.
I'm learning and making some progress. If I can figure out a fix for the trigger main spring problem it will be in good shape.
I have modified the broken trigger spring on my original trigger assembly by deepening and slightly enlarging the crescent shaped hole. I used a small swiss file to mod the half-hole so it would fit further under the bolt/screw. It seems to be working OK so far. I thread locked the main spring bolt/screw so it won't work loose while firing ....hopefully.
There's something weird going on here. The trigger assy and lock assy worked together fine before I took the rifle apart but, after repairing both, they no longer fit well. I'm still using the original trigger assembly that came with the rifle but, when I reassembled the action, the hammer would not engage half cock or cock. I removed the trigger assy to check the fit of the trigger leaf to the sear arm and the found that the leaf(s) was interfering with the sear and not allowing it to engage. I had to modify the sear arm/spur that contacts the trigger leaf because the fit was too close. It looks like it had been modified before by a previous owner by adding a tab (approx. 1/2") to the end of the sear arm because it was too far from the trigger leaf(s). Basically, I had to remove most of what was added ....about 1/4".
I'm guessing the sear must have changed positions when I replaced the spring. Don't have a clue as to how that is possible. Nothing I can see is broken or bent but, it's like the sear is cocked back approx. 1/4" from the position it was in before I replaced the sear spring. ??????
Any ideas about this puzzle?
Took her to the range today and got to fire 4 rounds before the lock malfunctioned. Inspection at home revealed the sear spring rotated up and was not pushing the sear into engagement. Don't yet know how I'm going to fix that but, I found a couple of slightly loose screws and that may have caused/contributed to the problem. I'm thinking about a new lock.
I also had trouble with the no. 11 caps (CCI magnum) misfiring. It seems the hammer struck them hard enough as they showed an indentation but, could not get even one to fire. I happen to have some no. 10s (Remington) on hand and they worked but, also had one misfire with those. Beginning to wonder if my hammer strike is not hard enough ....or if I bought some bad caps. ????? Would it be safe to unscrew the nipple about 1/2 to 1 turn?
I hit a 17" X 11.5" target at 50 yds. four times. I wouldn't call it a group, more like a gathering.") First two hit approx. 8 to 10" to the right, 3rd shot hit approx. 1" left and the 4th shot was about 6" high. Don't know why it jumped from left to right like that but, I do know that my patches were too thin (not very tight in the bore), too large, and too soft. Got to get different material for patches and cut them smaller.
First two hit approx. 8 to 10" to the right, 3rd shot hit approx. 1" left and the 4th shot was about 6" high. Don't know why it jumped from left to right like that but, I do know that my patches were too thin (not very tight in the bore), too large, and too soft. Got to get different material for patches and cut them smaller.
I ran about 4 wet patches (water and dish soap) down the bore at the range and then took it home to clean and inspect. I used the same solution at home and thought I had the bore clean until I inspected it with a light. Wow, nasty. So, I got out the cleaning solvent and a .50 cal. bore brush. Scrubbing with the brush followed by a patch revealed a nasty mess in the bore that took a while to get clean. I "think" it's clean now.
Looking forward to another trip to the range later this week.
I also had trouble with the no. 11 caps (CCI magnum) misfiring. It seems the hammer struck them hard enough as they showed an indentation but, could not get even one to fire. I happen to have some no. 10s (Remington) on hand and they worked but, also had one misfire with those. Beginning to wonder if my hammer strike is not hard enough ....or if I bought some bad caps. ????? Would it be safe to unscrew the nipple about 1/2 to 1 turn?
I hit a 17" X 11.5" target at 50 yds. four times. I wouldn't call it a group, more like a gathering.
First two hit approx. 8 to 10" to the right, 3rd shot hit approx. 1" left and the 4th shot was about 6" high. Don't know why it jumped from left to right like that but, I do know that my patches were too thin (not very tight in the bore), too large, and too soft. Got to get different material for patches and cut them smaller. I ran about 4 wet patches (water and dish soap) down the bore at the range and then took it home to clean and inspect. I used the same solution at home and thought I had the bore clean until I inspected it with a light. Wow, nasty. So, I got out the cleaning solvent and a .50 cal. bore brush. Scrubbing with the brush followed by a patch revealed a nasty mess in the bore that took a while to get clean. I "think" it's clean now.
Looking forward to another trip to the range later this week.
- Joined
- Sep 23, 2010
- Messages
- 13,946
- Reaction score
- 915
New lock and trigger.
Yeah, I think you're right. I have a new trigger but, the main spring is broken. I need to call Deer Creek and get that replaced. A new lock is probably in order. Deer Creek lock or L&R ? If I go with L&R, will I also need their trigger assy to work with their lock or will the Deer Creek lock work OK with it?
- Joined
- Sep 23, 2010
- Messages
- 13,946
- Reaction score
- 915
I'd talk to L&R if they ever get back online. You might have to do a little inletting to get it to work, but it's a better lock.
- Joined
- Sep 23, 2010
- Messages
- 13,946
- Reaction score
- 915
Update:
Sent the broken trigger assembly back to Deer Creek for replacement this morning. Hope they return a new one quickly. The main trigger spring on this new one snapped across the bolt hole while I was adjusting it. Don't know what metal these springs are made of but, it's very brittle.
Close inspection of the sear in the factory lock revealed that it is broken. The nose (part that contacts the tumbler) was ragged and uneven so, I attempted to dress it up with a swiss file. It didn't help and may have made it worse. So, I ordered a new lock this evening from Deer Creek and I hope to have it by Sat. or Monday.
On a positive note, my experimental "fix" for the broken main trigger spring on the factory assembly (or at least the one that came with the rifle) seems to be holding. It survived the short shooting session so, maybe it will last a while.
Forgot to mention that I finally got the old nipple out of the bolster. I tried using a new nipple wrench and it wouldn't budge even after using a heat gun (very hot). I finally clamped on it with a pair of vice grips and carefully turned it after getting it really hot with the heat gun. It was difficult to turn but, it finally came loose. First thing I noticed was the crud all over the threads (thread lock?) in the hole and on the nipple. I cleaned that up with a bore brush and solvent and the new nipple screwed right in with no problem. I put anti-seize compound on the threads this time.
Second thing I noticed was the large hole in the end of the nipple. Compared to the new nipple I bought, the hole was huge. Wonder why the difference?
Due to the issue with the caps failing to fire, I've ordered a Spitfire nipple hoping it will cure the failure to fire problem with the no. 11 caps. Both no. 11 and no. 10 caps fit fairly loose on the Traditions brand stainless nipple I installed.
Waiting for the new lock assy and trigger assy ....and they can't get here fast enough.
I just found the "Gun Works Muzzle-loading Emporium" web site (in Oregon) and I see they have individual lock parts for CVA rifles. I've found a sear for a CVA Hawken and am wondering if it will fit the lock in my rifle ?
Anyone have experience with these parts?
Anyone have experience with these parts?
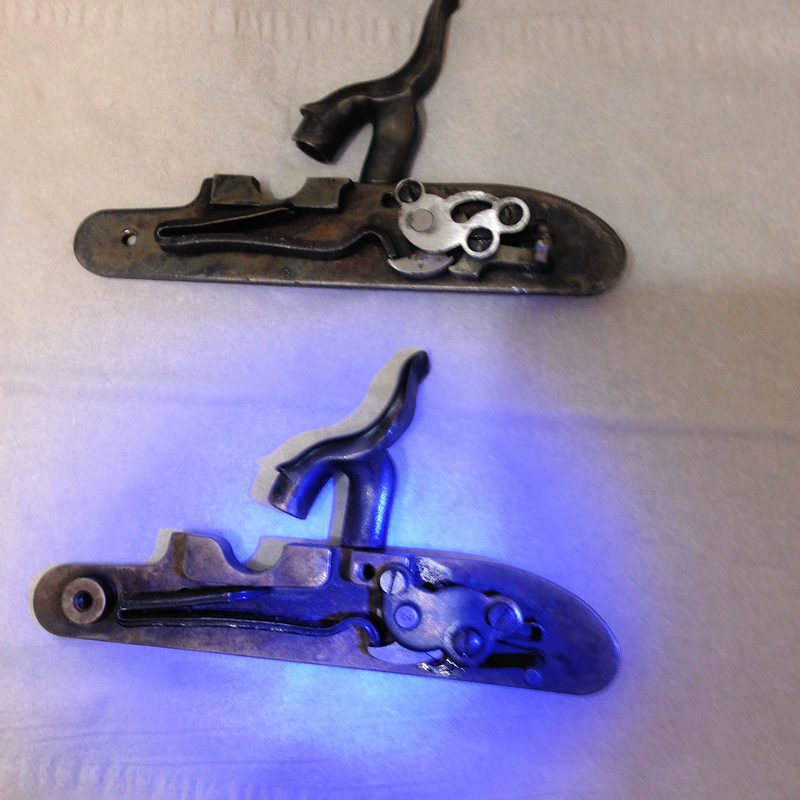
The new lock from Deer Creek arrived this afternoon and I'll need to do a bit of fitting. There is a shoulder around the forward bolt hole about 1/4" in diameter and depth/height on the new lock plate. So, I'll need to recess and enlarge the hole in the stock to allow the lock plate to fit flush. After that, everything should fit snug.
I also noticed the fly in the new lock it made of much thinner material and mounted on the outside (away from the lock plate) of the tumbler. All seems to work well but, will be able to tell more when I get it installed. I'm hoping the trigger assembly will match up alright without major work. We'll soon see.
Picture: Old on top ...
- Joined
- Sep 23, 2010
- Messages
- 13,946
- Reaction score
- 915
Quite a few differences. Look at the bend of the main spring.
Yeah, I noticed that too. Also, just discovered that the front bolt hole does not go all the way through and now both lock securing bolts are about 3/16 too long. Gonna have to saw a bit off of one to make it fit. This operation is just full of surprises and I haven't tried to fit the trigger assy yet. I guess it could be a lot worse.
Just measured and the bolt is .140" too long.
I guess it could be a lot worse.Just measured and the bolt is .140" too long.
- Joined
- Sep 23, 2010
- Messages
- 13,946
- Reaction score
- 915
You should have bought a kit and built the gun from scratch.
Similar threads
- Replies
- 5
- Views
- 343
- Replies
- 10
- Views
- 508
- Replies
- 4
- Views
- 400
- Replies
- 7
- Views
- 381
